Membres

Affichage des articles dont le libellé est Fresco Paint. Afficher tous les articles

lundi 5 août 2019

Tutorial - Mixed Media Halloween


Hello everyone! Today I'm sharing a step-by-step tutorial on how to make a Mixed Media Halloween scene. I chose to use 3 super cute Halloween stamps sets from the Kraftin' Kimmie Store - MINI MONSTERS, HAUNTED HOUSE and HARVEST BLESSINGS. I stamped elements from the Mini Monsters and Harvest Blessings set in Wicked Black Ink, did some fussy cutting and colored them in Copics.

Bonjour à tous! Je partage aujourd'hui un tuto sur une scène Mixed Media :) J'ai utilisé 3 sets de tampons Kraftin' Kimmie - MINI MONSTERSHAUNTED HOUSE et HARVEST BLESSINGS. J'ai tamponné mes éléments à l'encre Wicked Black Ink, découpé mes images et je les ai mises en couleur au Copic.


Skin/ Peau: E21, 50, 51
Purple costume/ Costume violet: V09, 15, 17
Red Costume/ Costume rouge: C7, R35, 37, 39
Horns/ Cornes: E41, 43
Balloons/ Ballons: G28, YG01, 03, 17
Pumpkins/ Citrouilles: Y35, YG95, 99, YR04, 07, E08, 19 
Cat/ Chat: C2, 4, 6, R20

Now to the background:

Et maintenant le fond:


I used a square grey board and covered it in red, orange and yellow paints applied with a sponge.

J'ai utilisé un carton carré que j'ai recouvert de peinture rouge, orange et jaune, appliquée à l'éponge.


To add a bit of interest to my scene and really have a Halloween feel to it, I stamped the HAUNTED HOUSE in Versafine.

Une fois le fond sec, j'ai tamponné la maison HAUNTED HOUSE à l'encre Versafine.


I then coloured the house using Pitt pens and gel pens. I also created a hill using acrylic paint and a sponge so the house would not be floating in the air ;)!

J'ai colorié ma maison au feutre Pitt et j'ai aussi créé une colline avec mes peintures acryliques pour éviter que ma maison ne flotte dans les airs ;)!


Next, I decided to add a bit contrast to the sky, so I added a bit of Ruby Red Hybrid Ink with a sponge dauber on the edges of my sky, then some Chipped Sapphire Distress Ink. I also stamped a little ghost and 2 stars, coloured with Posca pens.

J'ai ensuite tamponné avec une mousse de l'encre Ruby Red sur les bords de mon ciel et de la Distress Chipped Sapphire. J'ai aussi tamponné un petit fantôme et 2 étoiles, coloriés au Posca.


I then glued my elements on my board. The only character which I put on foam squares for a bit of dimension is the little purple monster.

J'ai collé tous mes éléments sur mon fond. Le seul élément collé sur mousse 3D pour avoir un peu de relief, est le petit monstre violet.


And lastly, I added a bit of gold to the edges of my board and some gel pen touches here and there. And voilà :)!

Enfin, j'ai rajouté du doré sur les bords de mon carton et des touches de stylo gel - et voilà :)!


Thanks for stopping by, have a fab Monday everyone! Hugs,
Merci de votre visite, bonne journée à tous! Bises,
Delphine xx

dimanche 28 juillet 2019

Dreaming of the Sea - Glimps DT


Hello everyone! With the extreme temperatures we are having at the moment, who is not dreaming of WATER ?!? Hence my post today, featuring the ocean and one of the super cute mermaids available from the Glimps store, called Sitting Mermaid
I printed my sirene, did some fussy cutting and coloured her in Copics.

Bonjour à tous! Un peu d'eau et de fraîcheur aujourd'hui avec une adorable sirène de la boutique Glimps - Sitting Mermaid. Je l'ai imrpimée et découpée, puis mise en couleur au Copic.


Skin/ Peau: E21, 50, 51, 71
Hair/ Cheveux: BV08, V04, 06, 17
Body/ Ecailles: B04, 06, 26, 29, 69
Rock/ Rocher: W5, 7, 9

I decided to create a background for my sirene on a grey board. I used Fresco acrylic paints, applied with a sponge, for my sky and sea.

J'ai créé un fond sur un carton avec des peintures acryliques Fresco, appliquées à l'éponge, pour faire le ciel et la mer.


To add more interest to the background, I drew some land, palm trees and birds using Pitt pens. I also added touches of white to the sea with a Gelly Roll pen.

Pour agrémenter un peu le fond, j'ai dessiné des palmiers et des oiseaux au feutre Pitt. J'ai aussi ajouté quleques touches de blanc à la mer avec un stylo gel Gelly Roll.


I then glued my sirene to my sirene to the background - and here is the little scene:

J'ai ensuite collé ma sirène sur mon fond - voici la petite scène finale:


Thank you very much for your visit, have a great day! Hugs,
Merci de votre visite et bonne journée! Bises,
Delphine xx

mardi 2 juillet 2019

Art Journal Page for Tiddly Inks Challenge


Bonjour à tous! Nouveau challenge chez Tiddly Inks and le thème est SOUS/DANS LA MER! 

Hello everyone! I'm back with our new challenge at Tiddly Inks and this time it's UNDER THE SEA! You can see lots of inspiration on our challenge blog HERE :)

J'ai décidé de créer une page sur le thème marin - avec des sirènes - dans mon journal, ça faisait longtemps - et ça fait beaucoup de bien!! J'ai utilisé des tampons du set Mini Mermaid Fun, disponibles aussi en digis sous les noms Amy and Her Mini Mermaid Friends et Octopi My Heart :)

I decided to create an art journal page, it has been a long time and it felt soooo good to dive into my journal! I used stamps from the Mini Mermaid Fun stamp set, also available as digis in Amy and Her Mini Mermaid Friends and Octopi My Heart :)


Colouring: Copics on Make it Colour Blending Card and acrylic paint, gel pen on Moleskine journal

J'ai créé le fond avec de l'acrylique principalement - Fresco et Distress Paint - et fait le sable avec du papier imprimé collé et recouvert d'acrylique aussi. J'ai ajouté un rocher au marqueur acrylique et des algues au stylo gel Pentel. J'ai tamponné, découpé et colorié tous mes personnages au Copic avec quelques touches de crayon Polychromos et je les ai ajoutés à ma scène. 

I created the background in acrylics mostly - Fresco Paint and Distress Paint - and I used DPs for the sand which I covered in acrylics too. I added a rock using acrylic markers and weeds using Pentel gel pens. I stamped, fussy cut and coloured all my elements in Copics with a few touches of Polychromos and I added them to my scene.


Rejoignez-nous avec toutes vos créations maritimes ;)! Merci de votre visite et bonne journée! Bises,

We hope you will join us for this challenge! Thank you very much for your visit, have a great day! Hugs,
Delphine xx

mercredi 12 décembre 2018

Glimps Nativity Scene


Hello everyone! I'm back to share a little scene featuring some of the adorable nativity stamps by Glimps Digital Stamps - just take a look at the latest release! I chose to use Family and coloured them in Copics of course ;)


Skin: E000, 00, 11, 70

Mary
Hair: BV04, C7, 9
Clothes: B000, 00, 02, 16, W0, 1, 3

Joseph
Hair: E25, 31, 59
Clothes: E40, 41, 42, 43, 44, 47
Walking Stick: E47, 49

Baby Jesus
Crib: E55, 57, Y11, 26


I decided to create a background for the Holy Family on a grey board. I used Fresco Paints, applied with a sponge. 


I then added black hills to the background with a Pitt pen and I sponged a bit of Distress Ink around the edges of my sky. 


I then glued my images to my board with tape and foam squares for a bit of dimension.


And at last I added a few details - a Make it Crafty Star Chipboard with stickles, a few gold dots in gel pen and I put some gold on the edges of my board, and voilà! 

Thank you very much for your visit! Hugs,
Delphine xx

vendredi 9 novembre 2018

November Krafty Peeks... Day THREE


Hello everyone! Welcome to Day THREE of our November Krafty Peeks at Kraftin' Kimmie Stamps... Today's set features some adorable little charachters by artist Melissa Baker-Nguyen and is called PERKY PENGUINS!


Aren't they super cute?!?

Here is my make for today :)


Stamps: Kraftin' Kimmie Stamps Perky Penguins
Inks: Kraftin' Kimmie Bubbly Blue Ink
Colouring: Copics on Make it Colour Blending Card and Copic Various Inks on Yupo
Stencil: Kraftin' Kimmie Sparkling Snowflakes Stencil
Other: Fresco Acrylic Paint, Bo Bunny Glitter Paste

I stamped my penguins in KKS Bubbly Blue Ink, coloured my images in Copics then did some fussy cutting. For the blue background, I used a piece of yupo paper and played with Copic Various Inks to create a sky. I then pasted my yupo on a grey board, added some acrylic paint for the bottom part of my scene and added my Copic images. I then used the KKS Sparkling Snowflakes Stencil with Glitter paste to add a few details.

Penguins: C0, 1, 3, 5, 7, 9, Y32, 35
Snow: BG000, C1

You'll see the list of Krafty DT members and Krafty Guests below :) Be sure to leave some love at each and every stop because one lucky commenter will WIN a gift voucher to the store!


Plus we're doing a GIVEAWAY of the ENTIRE November Release on the Krafty Friends FB page! Head on over and find out how you can win!


Be sure to join us for the LIVE ONLINE RELEASE PARTY on Saturday afternoon at 1pm EST! We'll be checking out all THREE of the new clear stamps sets, the THREE new inks and FOUR new Krafty Stencils!

Happy Hoppin'! Hugs,
Delphine xx

vendredi 31 août 2018

Paperbabe Stamps Challenge and a SALE!!


Hello everyone! There is a SALE going on this weekend at Paperbabe Stamps on the whole shop, so if you want to do a little shopping, now is a great moment ;)! You can see it all HERE!!

And today is the start of our new challenge too, with a beautiful picture to inspire you :)


As soon as I saw the picture, I knew what I was going to do - rock painting, something I have wanted to do for a while! I went for something not too complicated for a first try, using a sweet little fox from the Whimsical Woodland Set 1 ;)


I put gesso on my pebble first, then stamped my fox from the Whimsical Woodland Set 1 in Pumpkin Stazon and Sepia Archival Inks. I used acrylic paints then - mostly Fresco Paints - and added a few details in Posca Pens and a little heart from the Whimsical Woodland Set 1 too.

We hope you will join us HERE! Thank you very much for your visit, have a great day! Hugs,
Delphine xx

jeudi 31 mai 2018

Paperbabe Stamps Release!


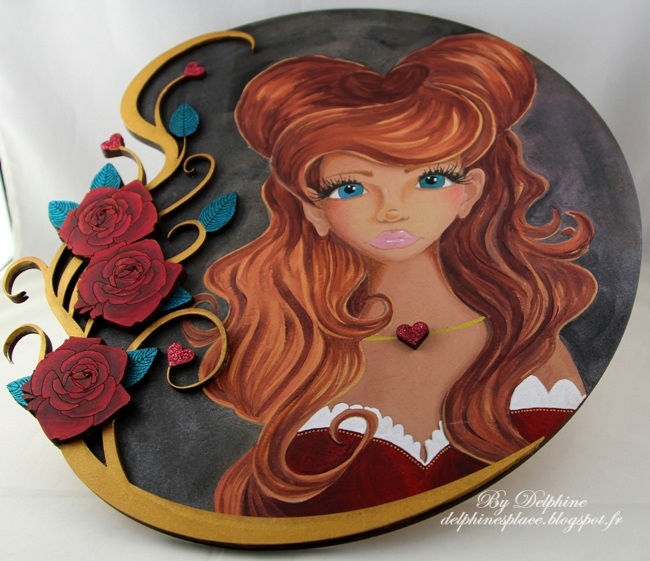
Hello everyone! We have a new release at Paperbabe Stamps which will be available on Saturday June 2nd, and let me tell you, it's simply A.MA.ZING!!! I have been in love with Kim's Mixed Media Templates and MDF Substrates for a long time, but these new MDF just took my breath away!!! I am in LOVE!!! Today we are introducing the Rose Edge MDF Layered Frame, and you can see all the details of this set in photos HERE, on the Paperbabe Stamps Blog, with also detailed pictures of Kim's gorgeous project! Here is my project - which I have loved doing so much, I'm going to make another one :)


I started by creating my Queen of Hearts using my Queen of Hearts MM Templates, and my Female Face Stamp Set (Mini) and Mini Ears stamp set (Mini). The details of her face were stamped using Versafine Onyx Black for the eyelashes, Smoked Gray for the rest. I coloured the black background in Acrylin Ink and coloured my Queen in Acrylic Paint. I then added shading to the face with my Polychromos and Pastel Pencils and added a few details in gel pen.


I then painted the flourish in gold acrylic paint, the roses in Copics and Polychromos, the leaves and hearts in Pentel Hybrid and Sakura gel pens.


I then stuck the flourish on my lady, and the roses on the flourish - easy :)!!


Thank you very much for your visit, have a fab day! Hugs,
Delphine xx

jeudi 29 mars 2018

Glimps DT - Mixed Media Ariel


Hello everyone! Today I'm sharing my Glimps DT make, a summery creation with an adorable mermaid - Ariel. I decided to do a bit of Mixed Media and picked a Grey Board on which I created my background.


I created the background by sponging Acrylic Fresco Paint on my board then added a bit of Liquitex acrylic inks on the edges. 


I then added a rock, seaweed and details using acrylic paint markers and Sakura and Pentel Gel Pens.


You can (maybe!) see the details a bit better on this picture :)


I coloured Ariel in Copics on Make it Colour Blending Card then did some fussy cutting.  

Skin: BV20, E000, 00, 11, RV02, W3
Hair: E49, RV55, 66, 99
Purple: V09, 12, 15, 17
Blue: B00, 04, 06, 18, 37
Flower: RV04, 55, 66, Y26


And I stuck my mermaid on my board and added a few bubbles and also covered Ariel's body in Wink of Stella. 

Thank you very much for your visit, have a great day! Hugs,
Delphine xx

samedi 14 octobre 2017

October Krafty Peeks... Day FOUR and a CHALLENGE!


  Hello everyone! Welcome to Day THREE of the October Krafty Peeks at Kraftin' Kimmie Stamps

Today is our final day of peeks and the LIVE ONLINE RELEASE PARTY is this afternoon at 2pm EST! Hope to see you there;)!

Our final set is by fabulous artist Becky Pearce! It's called REINDEER GAMES and it's totally adorable!!! 


It's also Challenge Day and the challenge is ANYTHING GOES (as it always is during release week)! So create a card a card, scrapbook page or altered item with any stamp but if you use a Kraftin' Kimmie Stamp, you'll double your chances to win! We would love to see your KKS designs. At the end of the month, a WINNER will be announced from all the weekly challenges for October! We hope you can play along for a chance to win a $20 Gift Certificate to the krafty shop!

Here is my make for today :)


Stamps: Kraftin' Kimmie Stamps Reindeer Games
Colouring: Copics on Make it Colour Blending Card and Acrylic Paint on White board
Chipboard: Make it Crafty Snowflake and Heart
Other: Stickles, Glitter Paste, Embossing Powder

We hope you can join us for all the fun and excitement and prizes beginning today at 2pm EST at our LIVE ONLINE RELEASE PARTY!


All of the Krafty Krew and Guests listed below have lots of designs to share with you! Be sure to hop around and leave some love at each and every stop because one lucky commenter EACH DAY OF THE PEEKS will WIN a gift voucher to 
tamps.com/">the store and the winners will be announced at the party today! Happy hoppin'! Hugs,
Delphine xx

vendredi 25 août 2017

Krafty Komeback!


Hello everyone! It's time for a Krafty Komeback! How about a Halloween comeback, with one of my all times favourite stamps by Annie Rodrigue :)? As you know lots of the rubber stamp sets at Kraftin' Kimmie have long retired and are not available for purchase anymore and a few of our faves are being rereleased in CLEAR! And today we're announcing a new one!

So, as I was saying, Annie Rodrigue has revamped this fabulously spooky image and some of the sentiments have been changed too, so even if you have the original from years ago, you'll want the new WITCHYPOO!!!


Here is my make for today, another mixed media board:


Stamp: Kraftin' Kimmie Stamps Witchypoo
Colouring: Copics on Make it Color Blending Card and Fresco Paint and Distress Paint on white board

I coloured Witchypoo in Copics and fussy cut it. I did a background on a white board using Fresco and Distress Paints, then stamped a few elements in black using stamps from my stash. Then I put my witch on foam squares for a bit of dimension - and because she is flying ;)!

The Krafty Krew DT members listed below have created some spooky creations to inspire you so be sure to hop around! Then hop over to the shop because WITCHYPOO is NOW AVAILABLE!

It's also Frugal Friday and we've got FOUR sets on sale 40% OFF! But only for the weekend and only while supplies last! So be sure to check them out!

Happy hoppin'! Hugs,
Delphine xx