Membres

Affichage des articles dont le libellé est Posca. Afficher tous les articles

lundi 5 août 2019

Tutorial - Mixed Media Halloween


Hello everyone! Today I'm sharing a step-by-step tutorial on how to make a Mixed Media Halloween scene. I chose to use 3 super cute Halloween stamps sets from the Kraftin' Kimmie Store - MINI MONSTERS, HAUNTED HOUSE and HARVEST BLESSINGS. I stamped elements from the Mini Monsters and Harvest Blessings set in Wicked Black Ink, did some fussy cutting and colored them in Copics.

Bonjour à tous! Je partage aujourd'hui un tuto sur une scène Mixed Media :) J'ai utilisé 3 sets de tampons Kraftin' Kimmie - MINI MONSTERSHAUNTED HOUSE et HARVEST BLESSINGS. J'ai tamponné mes éléments à l'encre Wicked Black Ink, découpé mes images et je les ai mises en couleur au Copic.


Skin/ Peau: E21, 50, 51
Purple costume/ Costume violet: V09, 15, 17
Red Costume/ Costume rouge: C7, R35, 37, 39
Horns/ Cornes: E41, 43
Balloons/ Ballons: G28, YG01, 03, 17
Pumpkins/ Citrouilles: Y35, YG95, 99, YR04, 07, E08, 19 
Cat/ Chat: C2, 4, 6, R20

Now to the background:

Et maintenant le fond:


I used a square grey board and covered it in red, orange and yellow paints applied with a sponge.

J'ai utilisé un carton carré que j'ai recouvert de peinture rouge, orange et jaune, appliquée à l'éponge.


To add a bit of interest to my scene and really have a Halloween feel to it, I stamped the HAUNTED HOUSE in Versafine.

Une fois le fond sec, j'ai tamponné la maison HAUNTED HOUSE à l'encre Versafine.


I then coloured the house using Pitt pens and gel pens. I also created a hill using acrylic paint and a sponge so the house would not be floating in the air ;)!

J'ai colorié ma maison au feutre Pitt et j'ai aussi créé une colline avec mes peintures acryliques pour éviter que ma maison ne flotte dans les airs ;)!


Next, I decided to add a bit contrast to the sky, so I added a bit of Ruby Red Hybrid Ink with a sponge dauber on the edges of my sky, then some Chipped Sapphire Distress Ink. I also stamped a little ghost and 2 stars, coloured with Posca pens.

J'ai ensuite tamponné avec une mousse de l'encre Ruby Red sur les bords de mon ciel et de la Distress Chipped Sapphire. J'ai aussi tamponné un petit fantôme et 2 étoiles, coloriés au Posca.


I then glued my elements on my board. The only character which I put on foam squares for a bit of dimension is the little purple monster.

J'ai collé tous mes éléments sur mon fond. Le seul élément collé sur mousse 3D pour avoir un peu de relief, est le petit monstre violet.


And lastly, I added a bit of gold to the edges of my board and some gel pen touches here and there. And voilà :)!

Enfin, j'ai rajouté du doré sur les bords de mon carton et des touches de stylo gel - et voilà :)!


Thanks for stopping by, have a fab Monday everyone! Hugs,
Merci de votre visite, bonne journée à tous! Bises,
Delphine xx

vendredi 26 avril 2019

Paperbabe Stamps Challenge #92


Hello everyone! We are back with a new challenge at Paperbabe Stamps and our theme is "FLOWERS/ GARDENS"! By joining us, you could win a Paperbabe Stamps Gift worth up to £20 for the store! So get those flowers out ;)!

Here is my make for today:


Stamps: Paperbabe Stamps Mini Profile Face stamps
Templates: Paperbabe Stamps Mini Female Profile Curly Fringe and Mini Head & Torso Templates
Colouring: acrylic and Posca pens on canvas

I used the Mini Female Profile Curly Fringe and Head & Torso Templates to trace the outlines of my lady in pencil. I then coloured the background in acrylic paint and painted the skin and hair using paint and markers. I then added the face features thanks to theMini Profile Face stamps. Finally, I added black outlines with a Posca pen and doodled on my background. 

We hope you can join us HERE! Thank you very much for your visit, have a great day! Hugs,
Delphine xx

jeudi 21 mars 2019

Glimps DT: Mixed Media Canvas Board


Hello everyone! I'm going Mixed Media today with my Glimps DT make, since I really wanted to use the Painter digi and it called for a bit of painting ;)


Using pink and white Pebeo Acrylic paint, I covered my 10x10cm canvas board.


I then painted a red heart in the middle of my canvas. Using a sponge, I added red paint on the edges of my canvas, and once the red was dry, I did the same with black acrylic paint. 


I added gold hearts with my Kraftin' Kimmie Happy Hearts Stencil and a gold gel pen. I then put some black outlines in Posca pen. I also put a bit of gold on the edges of the canvas. 


I coloured the Painter image in Copics:
Skin: E000, 00, 11, R12, Y71
Eyes: B00, 02, 63
Hair: E25, 59, YR24
Red: R35, 37, 39
Black: T5, 7, 9
Brush: E31, 35, 37, 74, 77, 79, Y11, 26, 28


I then glued my image to the board with tape, and voilà :)!


Thank you very much for your visit, have a fab day! Hugs, 
Delphine xx

mardi 26 février 2019

Kraftin' Kimmie Skrappy Challenge


Hello everyone! We have a new Krafty Skrappy Challenge for you at Kraftin' Kimmie Stamps, this challenge is for ANYthing but a Kard! We challenge you to make ANYTHING BUT A CARD! So you can create anything you want as long as it's not a card! So that means bookmarks, gifts, scrapbook pages, journal art, planner pages, tags boxes... pretty much anything that includes a krafty stamp! You have all month long to play, until Monday March 25th at midnight EST and you can enter as many times as you like! Just make sure to use a Kraftin' Kimmie Stamp and make sure it's a new creation!
As soon as we have at least five entries, we'll be giving away a PRIZE! One lucky krafter will win a $20 Gift Voucher to the krafty store!

Also be sure to also share your creations on our Krafty Friends FB page

I've decided to make a little painting using the adorable Cuddles the Puppy set. I used an MDF Paperbabe Stamps substrate for the base :)


Stamps: Kraftin' Kimmie Stamp Cuddles The Puppy
Substrate: Paperbabe Stamps MDF
Colouring: Acrylic markers, Acrylic Paint, Posca Pens, Polychromos

I stamped my character in Wicked Black Hybrid Ink directly on the MDF oval shape. I painted everything using acrylic markers and paint then added littles details such as the leaves, blades of grass, flowers in paint and Posca pens. I also added some shading in Polychromos.
I then painted the flourished frame in acrylics and added dots in Poscas, then used glue to put my 2 MDFs together.

We hope you can play along! Thank you very much for your visit, have a great day! Hugs,
Delphine xx

mercredi 24 octobre 2018

Beagle Baby Looooooove


Hello everyone! I'm sharing a very special card today, inspired by real life! People who know me a little know how much I love my baby beagles and I am extremely lucky to have had an image made by the fabulous Christy at Tiddly Inks, based on my second baby beagle who arrived home last month :) I can't tell you how blessed I feel!! Huge thanks again to you Christy!! 
So this is the image I'm using today - my Baby Beagle by Tiddly Inks!

I printed my image and die cut it with an MFT circle die, to then focus on the colouring.


I coloured the sky first, using B00 and B02. I added a cloud in BV20, C0 and C1 to avoid having a completely flat sky.


I then coloured my beagle with E30, 31, 34, 44 and 47 for the browns. I added shadows to the white colouring them in W00 first to see where I would place them and then W0, 1, 3.


Next I coloured the grass with my usual combo of G28, YG01, 03, 17 and 67.

So all the Copics I used are:
Sky: B00, 02
Grass: G28, YG01, 03, 17, 67
Beagle Puppy: E30, 31, 34, 44, 47, W00, 0, 1, 3


Now to add more depth, I added a few details to my image: birds in the sky with a Copic Multiliner, a bit of blue Distress Ink aroung the edges of my scene and I used Posca and gel pens to add blades of grass and dots for flowers.

I then mounted my image on another MFT die cut and on a piece of BoBunny DP. The sentiment was done using Make it Crafty Alpha Chipboard painted in white acrylic. 


Thank you very much for your visit, have a great day! Hugs,
Delphine xx

jeudi 31 mai 2018

Paperbabe Stamps Release!


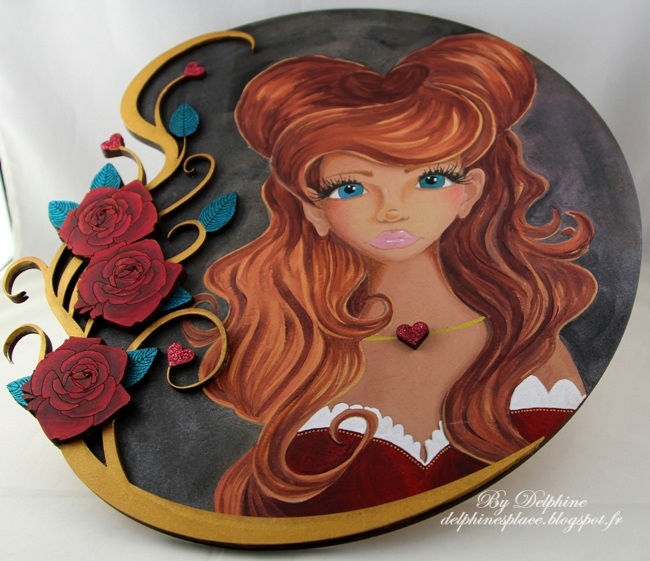
Hello everyone! We have a new release at Paperbabe Stamps which will be available on Saturday June 2nd, and let me tell you, it's simply A.MA.ZING!!! I have been in love with Kim's Mixed Media Templates and MDF Substrates for a long time, but these new MDF just took my breath away!!! I am in LOVE!!! Today we are introducing the Rose Edge MDF Layered Frame, and you can see all the details of this set in photos HERE, on the Paperbabe Stamps Blog, with also detailed pictures of Kim's gorgeous project! Here is my project - which I have loved doing so much, I'm going to make another one :)


I started by creating my Queen of Hearts using my Queen of Hearts MM Templates, and my Female Face Stamp Set (Mini) and Mini Ears stamp set (Mini). The details of her face were stamped using Versafine Onyx Black for the eyelashes, Smoked Gray for the rest. I coloured the black background in Acrylin Ink and coloured my Queen in Acrylic Paint. I then added shading to the face with my Polychromos and Pastel Pencils and added a few details in gel pen.


I then painted the flourish in gold acrylic paint, the roses in Copics and Polychromos, the leaves and hearts in Pentel Hybrid and Sakura gel pens.


I then stuck the flourish on my lady, and the roses on the flourish - easy :)!!


Thank you very much for your visit, have a fab day! Hugs,
Delphine xx

samedi 10 mars 2018

March Krafty Peeks... Day THREE and a Challenge!


  Hello everyone! Welcome to the third day of our March Krafty Peeks at Kraftin' Kimmie Stamps! Today is our final day of peeks and the party is this afternoon at 1pm EST on Facebook
Our last stamp set is an absolutely adorable set from artist Becky Pearce, called DINO-MITE PALS!!


And don't forget! It's also Challenge Day and the challenge is ANYTHING GOES (as it always is during release week)! So create a card a card, scrapbook page or altered item ! We would love to see your KKS designs. You have a week to play and at the end of the month, a WINNER will be announced from all the weekly challenges for March! We hope you can play along for a chance to win a $40 Gift Certificate to the krafty shop!

Here is my make for today :)


Stamps: Kraftin' Kimmie Stamps Dino-Mite Pals
Colouring: Copics on Make it Colour Blending Card
Other: Spica glitter pen, Sakura Gelly Roll, Posca

I stamped my two cute dinos in Adirondack Cloudy Blue to avoid the black lines and I drew a background for them. I coloured everything in Copics, then added touches of Sakura gel pens, Posca, and Spica Glitter pens here there.

Sky: 0, B000, 00
Grass and bushes: YG01, 03, 06, 17, 67
Distant background: BV00, T1
Rocks: T3, 5, 7
Tree: E33, 35, 37, 49, 59, YG03, 17, 67
Blades of grass: B39, G28, T7, YG67
Left Dino: E19, 95, 97, 99, T1, 5
Right Dino: R00, 02, 05, T1, 5

We hope you can join us for all the fun and excitement and prizes beginning today at 1pm EST at our LIVE ONLINE RELEASE PARTY


All of the Krafty Krew and Guests listed below have lots of designs to share with you! Be sure to hop around and leave some love at each and every stop because one lucky commenter will WIN a gift voucher to the store! Happy hoppin'! Hugs,
Delphine xx
mardi 27 juin 2017

Kraftin' Kimmie Skrappy Challenge


Hello again everyone! We have a new Krafty Skrappy Challenge for you at Kraftin' Kimmie Stamps, this challenge is for ANYthing but a Kard! So you can create anything your heart desires as long as it's NOT A CARD! Calendars, bookmarks, scrap pages, holiday gifts... you get the picture! You will have a whole month to play along and you can play as many times as you like! Here are a few things to remember...

THIS MONTH'S THEME: ANYTHING GOES!
1. Create ANY scrap page, Project Life Layout or pocket page cards, altered item, etc... JUST NOT A CARD!
2. MUST be a NEW creation (created on or after this post date)
3. MUST use Kraftin' Kimmie Stamps to be entered into the drawing.
4. You have a month to play, enter AS MANY TIMES as you'd like!
5. PRIZES? Of course there are prizes! Once we've reached 5 entries, we draw a random winner (winner will be drawn at the close of the challenge)
6. You have until Monday, July 24th at 12:00 pm EST to get your entries in.
7. Be sure to also share your creations on our Krafty Friends FB page so we can all drool! 

I've done a little tag for this challenge :)


Stamps: Kraftin' Kimmie Stamps Beach Blanket Bingo
Colouring: Copics on Make it Colour Blending Card and Zig Clean Colour Real Brush on Canson Montval
Dies: Penny Black

I coloured my image in Copics and fussy cut it. For the background, I took a piece of wtc paper then drew and coloured in Zigs and a bit of Poscas. I die cut it and pasted it on the tag.

Copics used:
Rabbit: E40, 41, 42, 43, R20, W3
Swimming trunks: B02, 04, 16, 37, YR04
Carrot: G28, YG45, Y35, YR04, 07
 Board: T5, R35, 37, 39

We hope you can play along! Thank you very much for your visit, have a great day! Hugs,
Delphine xx

vendredi 23 juin 2017

Fabulous Friday


Hello everyone! It's Fabulous Friday at Tiddly Inks, so I'm sharing a little mermaid make... I think the heat wave hit me so hard I needed to find freshness where I could ;)! So water and mermaids have been on my mind ;)


Colouring: Copics on Make it Colour Blending Card and Distress Inks
Chipboard: Make it Crafty Hibiscus Flower Frame

Skin: E000, 00, 04, 11
Hair: E34, Y11, YR21, 24
Purple: V09, 15, 17
Fish: R02, 05, 08, T1, 3

I coloured my Mini Mermaid and Fish in Copics then cut them out. I created a blue background using Distress Inks on watercolour paper and die cut it to match my Hibiscus Flower Frame. For the frame, I used Poscas and added stickles :)

Thank you very much for your visit, see you later! Hugs,
Delphine xx

samedi 17 juin 2017

Kraftin' Kimmie Saturday Challenge


Hello everyone! Today is the start of a new challenge at Kraftin' Kimmie Stamps and our challenge this week is "MERMAIDS"!  

You can have a chance to win a $20 gift card to the Shop! In keeping in line with the rest of our challenges (Wonderful Wednesday and our NEW Krafty Scrappy Challenge), one winner per month will be drawn from all Saturday Challenge entries to win a $20 Gift Card to the Shop! You can enter as many times per month as you'd like!

Have you joined the Kraftin' Kimmie's Krafty Friends FB group? It's the best place to keep up with all of the goings on as well as sharing YOUR creations and getting inspired by other Krafty Friends' creations!

Tomorrow, Kimmie is having a RUBBER PARTY! So if you have some older KKS images on your wish list, now is the time!

In addition to the great Krafty Challenges and Wonderful Wednesday, each month we post a sketch. The sketch lasts all month long and if you use it in ANY of our challenges or WW's during that month, you get an additional chance to win a store gift card. You do NOT have to use the sketch, it's just a little extra boost for your mojo if you need it!

Here is my card for today :)


Stamps: Kraftin' Kimmie Stamps Serena Sparkles
Colouring: Copics on Make it Colour Blending Card
Other: Make it Crafty Chipboard Ornate Rectangle Frame, Stardust Stickles, Wink of Stella

I coloured my mermaid in Copics then cut my image to match the size of my Make it Crafty Chipboard Frame. I coloured the frame in Copics and Poscas and added A LOT of stickles - after all my image is called Serena Sparkles ;)!!!

Skin: E000, 00, 04, 11, R20
Hair: E25, 31, 33, 59
Mermaid's body: B02, 04, 16, 37, 39, T7, V000, 01, 15, 17
Sand: E50, 51, 53
Ocean: BG11, 45, 53, 57 - B37, BG75, 78 for seaweeds
Rock: T1, 3, 5, 7, 9

Thank you very much for your visit, have a great day! Hugs,
Delphine xx

vendredi 16 juin 2017

Paperbabe Stamps Challenge #50


Hello everyone! Today is the start of a new challenge at Paperbabe Stamps and it's an easy one - Anything Goes!! We hope you will join us and try to win a gift voucher to the store
For this challenge, I took out my acrylic paints... which I probably have not touched for about 10 months... I had to do a bit of cleaning to remove the dust ;)!! Here is what I did: 


Stamps: Paperbabe Stamps Mini Female Face Stamp Set
Substrate: Paperbabe Stamps MDF Mixed Media Blanks Hanging Circles Set
Templates: Paperbabe Stamps Mini Head and Torso and Blunt Bangs Long 
Stencil: Paperbabe Polka Dots Stencil
Colouring: Acrylic paint, Polychromos, Posca on MDF

I used the big MDF circle from the Mixed Media Blanks Hanging Circles Set to create my portrait. I started to draw the shapes in pencil, using the Mini Head and Torso Templates, and the Blunt Bangs Long Template for the hair. I coloured the skin in acrylic paint then stamped the face features using the Mini Female Face Stamp Set. I painted everything in acrylics then added pencil (Polychromos). For the background, white ink on my Polka Dots Stencil :)

That was fun to create and really did me good :)! I hope you can have some fun too and will share your makes with us! Thank you very much for your visit, have a fab day! Hugs,
Delphine xx

vendredi 5 mai 2017

Paperbabe Stamps Challenge!!


Hello everyone! Happy day!! Paperbabe Stamps Challenges are back and it all starts again today! We have an easy one for you for the return of the challenges - it's ANYTHING GOES!! 
I decided to play with one of Chris's gorgeous fairies released last month - I just love fairies and gardens :)!


Stamps: Paperbabe Stamps Butterfly Fairy, Whimsical Woodland Set 2 and Set 4, and Butterfly Pieridae 
Colouring: Zig Clean Color Real Brush and Posca on Canson Montval

I created a watercoloured scene using fern, leaves and a branch from my Whimsical Woodland Set 2 and Set 4, a little butterfly from the Butterfly Pieridae set and of course Butterfly Fairy. I coloured everything using Zig Clean Color Real Brush and added little touches of Poscas here and there, the sentiment is handwritten. 

We hope you'll be able to join us at Paperbabe Stamps! Thank you very much for your visit, have a fab day! Hugs,
Delphine xx

vendredi 31 mars 2017

Paperbabe Stamps Blog Hop!


Hello everyone! Happy day, we're having a blog hop at Paperbabe Stamps today to share some gorgeous new stamps - fairies, fairies, fairies!!! And they are Chris's work!! I have always admired Chris's work from the first time I laid eyes on her creations so I'm particularly thrilled to share a make with one of them today!! She has designed a collection of beautiful Garden Fairies Stamps, the Butterfly Catcher, Butterfly Emerges, Butterfly Fairy and Musical Fairy! They are a larger set and each includes a beautiful sentiment!


To add extra fun to our blog hop, we are offering a prize - the whole Garden Fairy Collection for one lucky winner!!

Here are the details:

* A winner will be chosen at RANDOM from any of the designers' blogs and the Paperbabe Stamps Blog to win.
* Just leave a comment on any of the deisgners' blogs listed below for your chance to win! (You do not need to comment on all the blogs to qualify but it increases your chances)
* Deadline: You have until midnight on Sunday, 2nd April to leave a comment.
* Please check the Paperbabe Stamps blog on Wednesday, 5th April to see if you are our lucky winner!

Here is my sample using Musical Fairy:


Stamp: Paperbabe Stamps Musical Fairy
Colouring: Zig Clean Color Real Brush, Watercolour, Posca on Canson Montval

I just stamped my Fairy on Canson Montval paper and decided to create a garden background for her, using mostly Zigs, water, and a bit of Posca :)


... and I added little hearts... she is spreading love you know ;)

I absolutely LOVE these fairies and will be sharing another one very soon ;)! In the meantime, please visit my teamies to see their gorgeous makes!! Happy Hopping! Hugs,

Delphine xx