Membres

Affichage des articles dont le libellé est Gorjuss Girls. Afficher tous les articles

mercredi 22 mai 2019

BIG colouring!!


Bonjour à tous! Grand format aujourd'hui! Plutôt que de faire une carte, pour changer et remplir un de mes cadres, j'ai décidé d'utiliser un tampon Gorjuss XL, que vous pouvez voir sur ma feuille A4 ci-dessous pour vous donner une idée.

Hello everyone! Today, I've decided to go BIG! Yes, instead of making a card, I had a frame to fill so decided why not colour a big A4 image to go in it? I used an XL Gorjuss Girl stamp, which you can see below on an A4 sheet to give you an idea. 


Après avoir tamponné mon image, j'ai tracé un cadre au Multiliner Copic gris pour délimiter ma zone à colorier, l'idée étant ensuite de couper un peu de blanc sur les bords.

After stamping my Gorjuss Girl, I traced a rectangle using a Copic grey Multiliner to determine where I would stop my colouring - the idea being to just cut off some of the white edges to frame my girl in an 18x24 frame. 


J'ai commencé par le fond sans essayer de fondre les couleurs, avec du V12, 15, 17. Résultat très brouillon, mais pas problème!

I started by colouring the background without trying to blend the colours. I used V12, 15, 17. Very messy, but not a problem!


Avec ma recharge d'encre de Blender et une éponge naturelle, j'ai tamponné mon fond jusqu'à obtenir un résultat qui me convenait.

I then used my Blender 0 Refill on a natural sponge and dabbed until I was satisfied with the background. 


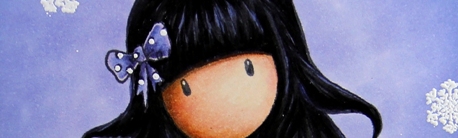
La Gorjuss - peau d'abord avec du YR000, 00, 01, E11, E71 et un peu de RV02 pour les joues.

Now to the colouring of my girl itself - I started with the skin as usual, in YR000, 00, 01, E11, E71 and a bit of RV02 for the cheeks. 


Les vêtements ensuite, je voulais rester dans les mêmes tons que mon fond, donc V09, 12, 15, 17 pour le violet. Pour le noir de la robe, C5, 7, 9 et pour les chaussettes C0, 1, 3. Je n'ai pas fait attention à préserver les détails comme les pois car je savais que j'allais les couvrir de stylo gel à la fin.

I then focussed on the clothes using the same colour family as my background - the purple is V09, 12, 15, 17. For the black of her dress, I used C5, 7, 9 and for the socks C0, 1, 3. As you can see, I did not pay too much attention to the little dots on her dress since I knew I would cover them in gel or paint pen at the end. 


Pour les cheveux, toujours pour préserver une certaine harmonie, j'ai utilisé mes C - C5, 7, 9, comme pour la robe.

I coloured the hair using my C markers to really have harmony in the picture - so C5, 7, 9 too, as for the dress. Here is a recap of all the colours I used:

Skin/ Peau: E11, 71, YR000, 00, 01, RV02
Hair/ Cheveux: C5, 7, 9
Dress/ Robe: C5, 7, 9, V09, 12, 15, 17
Socks/ Chaussettes: C0, 1, 3, V12, 15, 17
Ground/ Sol: C3, 5
Background/ Fond: V12, 15, 17


Et pour terminer, j'ai fait des coeurs avec un pochoir Kraftin' Kimmie et un stylo gel Pentel, puis j'ai ajouté un peu de blanc et doré au Pentel et Posca.

As a final touch, I added hearts using the Kraftin' Kimmie Stamps Happy Hearts Stencil and a Pentel gel pen, and I also added a bit of white and gold highlights in Posca pen and gel pen too.

Merci de votre visite et bonne journée! 

That's all from me today, thank you very much for your visit! Hugs,
Delphine xx

samedi 23 juin 2018

Gorjuss Scene


Hello everyone! I'm back to share a card I made for Copic Marker Europe, a Copic scene featuring a Gorjuss Girl and a little butterfly :) I chose to stamp my image using Memento Toffee Crunch Ink for a change from black lines.


I started by colouring the background: first the sky, using B00 and BG000, then the tree in E31, 35, 39, G21,24, 28, YG01 and the bushes using G28, YG01, 03, 17, 67. For the grass, I picked more YGs, using YG01, 03, 05, 06, 09, 17, 67. I then added shapes in the distance in BV000 and G20, and blades of grass in T7, B66 and YG67. The path was created with E40, 41, 42, 43.


I then coloured my Gorjuss Girl, choosing to cover the details of her dress (easier ;)!!). The reds are R22, 24, 27, 29, the light brown colour is E50, 51, 53. For the hair, I used T5, 7, 9 and BV04.
My image looked okay, but to make it look better I had to add a few details and pencil touches here and there...


I added shading to her skin and dress in Polychromos, coloured her eyes too and added some black to her hair. I added little dots and blades in the grass and bushes. Oh and a few gold dots to my girl's collar in gel pen too. And that was it :) I then die cut my image with an MFT die and wrote hello in white gel pen, as you can see below.


Sky: B00 and BG000
Tree: E31, 35, 39, G21,24, 28, YG01 
Bushes: G28, YG01, 03, 17, 67 + BV000, G20 in teh distance
Grass: YG01, 03, 05, 06, 09, 17, 67.
Blades of grass: B66, T7,YG67
Path: E40, 41, 42, 43

Skin: E000, 00, 11, 13, RV02
Hair: BV04, T5, 7, 9
Dress: E50, 51, 53, R22, 24, 27, 29
Butterfly: B66, 69, V06, 09

Thank you very much for your visit, have a beautiful day! Hugs,
Delphine xx

mercredi 28 juin 2017

Copic and MiC Chipboard!


Hello everyone! I'm sharing the card I made for Copic Marker Europe, with a Gorjuss stamp and chipboard in Copics - because you can colour chipboard with them and add a very "matching" touch to your card. The stamp I used is called Heartfelt.


Since I knew I wanted to use an oval frame chipboard, I started by colouring the background making it oval, using YG05, 03, 01, 00. I then coloured my Gorjuss skin in E04, 11, 00, 000.


For the dress, I wanted colour to pop as for my background and went for red, using a little bit of T5, then R39, 37, 35. I also coloured the heart in RV66, 55, 02 and made the underskirt black.


Next I did the hair with my favourite black combo - 100, then C9, C7 and BV04 for highlights. 


The frame I picked is a Make it Crafty Chipboard frame called Delicate Love Oval Frame. What I really like about those frames is the colour of the chipboard - a cream colour on which you can use and blend Copics.


I coloured the hearts first with the same reds I used for my image, then coloured the black with my 100 Copic and added tiny touches of gold with a paint pen. 
I die cut my image with an MFT oval die, added glue on the back of my frame to frame my image. I put my framed image on foam for a bit of dimension and that was it. 


Skin: E000, 00, 04, 11
Hair: 100, BV04, C7, 9
Red: R35, 37, 39 (+T5)
Pink: RV02, 55, 66
Background: YG00, 01, 03, 05


Thank you very much for your visit, have a great day! Hugs,
Delphine xx

samedi 24 décembre 2016

Merry Christmas!


Hello everyone! Today I'm sharing a Christmas card I made for Copic Marker Europe featuring a Gorjuss Girl - I just love these stamps :)


This Gorjuss Girl is called Ladybird. I stamped her in Memento Tuxedo Black Ink and die cut my image with a Lawn Fawn Stitched Rectangle. I first coloured the background, then my image using Copics. I then added a bit of shading to her skin using my Polychromos. I stamped little snowflakes in Versamark using a Bo Bunny snowflake and embossed them in white. I did the same for my sentiment, by CC Designs. Finally I applied some Distress Inks around my die cut image to make it pop a bit more.


Skin: E000, 00, 01, 11, 13 + pencil
Hair: 100, BV04, T7, 9
Pink: RV55, 66, 69
Purple: BV00, 02, 04, 08
Background: BV02, C2, 3


Thank you very much for your visit, have a great day and a Merry Christmas everyone! Hugs,
Delphine xx

mardi 29 décembre 2015

Simple Copic Background Tutorial


Hello everyone! Today I'm sharing a little tutorial on an easy, simple background I made for Copic Marker Europe. I love images with white space around them, but I also like how different you can make your image look by filling that space and adding a coloured background. Even with no background stamps near at hand, you can create simple ones. Today we are simply going to place our character in a room and imagine a wall behind her and carpeting on the floor.

The stamp I'm using for this tutorial is an "old" Gorjuss Girl stamp called Bear Hugs by Sugar Nellie.

Step 1

Stamp your character and with ruler and a Copic Multiliner (mine is black 0.05), draw two lines representing a skirting board.

Step 2

Choose a Copic for your background - mine is YR61 - and colour doing small circular movements. The aim is not to have a totally smooth wall, but rather mimic variations in the paint. 

Step 3

For the carpeting, select 3 or 4 markers in the same shade. I'm going to use E40, 41, 42, 43. First colour the whole floor surface with your lightest marker (E40), then make little dots in the foreground with your darkest colour (E43).

Step 4

Take your next colour, one shade lighter (E42), go over the E43 dots you have just done and widen the dotted area going towards the background. 

Step 5

Do the same with your E41, going over the E42 area and widening that dotted area even more.

Step 6

Take your lightest colour E40 and keep doing dots until you reach the skirting board.

Step 7

Colour the board (E44 here) and your character (details of colours below).

Step 8

With Copic Opaque White or a white pen, add little dots on the wall. (I have also added my sentiment, by Paper Smooches.)

Then trim your image as desired and put on a card :)

Skin: E000, 00, 11, 71
Hair: 100, BV04, C5, 7, 9
Blue: B34, 37, 39
White on Dress and Socks: W0, 1, 3
Bear: E30, 31, 33, 35, R20
Background: YR61
Floor: E40, 41, 42, 43
Board: E44


Thank you very much for your visit, have a great day! Hugs,
Delphine xx

jeudi 19 mars 2015

HUGE SPRING SALE at Quixotic Paperie!


Hello everyone! Have you seen the huge SPRING SALE at Quixotic Paperie? There are tons of stamps from all your favourite companies that are 25% off!!! Now is the time to go shopping ;)!! You can take a look at all the items on sale HERE!

The card I'm sharing today features one of the Gorjuss stamps still available from the store - and 25% off too - with which I created a little scene.


This Gorjuss Girl is called Little Red and I stamped her on Make It Colour Blending Card, coloured her in Copics, then cut her out. For the background, I used watercolour paper and used a combination of Dylusion Inks for the sky and acrylic inks and acrylic paint for the rest of the background. I'm sorry, my camera hates my blue/ purple background and turned it into a flashy blue but it's more purple in real life :(... and with Blogger automatically enhancing the photos :(... well, it's nicer in real life!!!

Copics: 
Skin: E000, 00, 01, 13, 70
Hair: 100, B45, W5, 7, 9
Cloak: C5, R35, 37, 39, 89, Y26
Dress: E84, 87, 89, W0, 1
Socks: W0, 1, 3, 7, 9 

Challenges I am entering:
Addicted to Stamps - Anything Goes
Take It Make It - Anything Goes (#2)
Love To Scrap - Anything Goes
Come And Get It - Make Your Own Background

Thank you very much for your visit, have a lovely evening/day and enjo shopping ;)! Hugs,
Delphine xx

lundi 8 décembre 2014

Tutorial for Copic Marker Europe


Hello everyone! I'm back today to share a tutorial on a 100% Copic card with a simple airbrushed background that I made for Copic Marker Europe - I absolutely love the look of airbrushed backgrounds! 

For today's example, I chose to do a simple winter scene with a character and just a couple of trees. Please note, I did not stamp and mask the character on my scene because I knew I wanted to add it at the end on 3D foam squares, but it is of course possible to stamp it at the beginning.

Material used for my card:
Make It Colour Blending Card
Airbrush and Copics
Masking Film or Post It notes


Step 1


Stamp the elements you need on your scene, starting with what you want to be in the foreground first. To mask, I used Post It Label Pads which have 100% adhesive backs, and picked different colours to show you clearly the different parts of the scene.
 Here, I stamped the little pine tree first where I wanted it, masked it (yellow), then I added orange strips around my "scene" to have an uncoloured frame at the end. I then stamped the tree on the left and masked it (pink). I thought I would have a little snow slope, so I just cut and put pieces of blue Post It Notes to create the slope and protect it from the airbrushing.

Step 2


Airbrush your lightest colour B00 going from left to right and right to left from the bottom of the image and stop midway of your sky. I like using 2 different shades for airbrushed skies (here Bs and BVs) and I always start with my lightest colour, so I can darken the colour afterwards if necessary. 

Step 3


Now start at the top of your image with your second shade - BV02 here - and go down little by little towards the blue area. Airbrush over the beginning of the blue part so that your colours look blended.

Step 4


Darken the sky at the top, using BV04 and stop in the BV02 area. The transition between the 2 BV areas is a bit too visible, but we will work on it in the next step:)

Step 5


Take your BV02 again and go over all the BV04 and BV02 areas starting from the top and being careful to add enough BV02 on the transition to blend it a little and airbrush on the upper part of the blue area too.

Step 6


Now remove your masks and check the result of your airbrushing. And now all you have to do is use your Copics to colour your scene.

Here is my finished card...


Skin: E000, 00, 11
Hair: B41, C5, 7, 100
Purples: V09, 12, 15, 17
Blues: B34, 37, 39
Hearts: R37
Background: B00, BV02, 04
Trees: BG000, C0, 1, 3, E31, 35, 59, G28, YG03, 17, 67
Snow: BG000, C0, 1, 3


Challenges I am entering:
Di's Digi Designs - Christmas
Simon Says Stamp - Christmas Holidays 
Paradise Of Stamps - Christmas

Thank you very much for your visit, enjoy the rest of your day! 
Hugs,
Delphine xx

vendredi 19 septembre 2014

Copic Gorjuss Rabbit


Hello everyone! I'm back to share the card I made for Copic Europe Marker and it's a Gorjuss Girl post in brown today. I love Gorjuss Girls and these stamps being quite big, I thought I would completely put the focus on her.


This Gorjuss Girl stamp is called I Love You Little Rabbit. I stamped it in Memento Tuxedo Black Ink on Make It Colour Blending Card and coloured it all in Copics. I started with the background using different shades of brown without trying to blend it all - an idea and technique first used by my beloved friend Zoe - and then coloured my image, using some of the same colours I used for the background. I then added Distress Inks Tea Dye and Vintage Photo around the borders. 


Skin: BV20, E000, 00, 01, 11, 23
Hair: 100, B41, C5, 7
Dress: E41, 42, 43, 44
Stockings: 100, C5, 7, E41, 42, 43
Rabbit: W0, 1, 3, 5
Background: E41, 42, 43, 44, 53

Thank you very much for your visit, have a lovely day! 
Hugs,
Delphine xx